Troubleshooting a Dead Car Battery
A car battery that fails to start the engine can be a frustrating experience, especially when it occurs unexpectedly. In many cases, the underlying issue is not a completely dead battery but rather a preventable condition such as corroded terminals or a loose connection. Understanding the basic steps to diagnose and address a non-starting vehicle can help drivers determine the appropriate course of action without unnecessary expense or delay.
The process of troubleshooting a dead battery involves a systematic evaluation of the battery’s physical condition, its electrical output, and the integrity of the connections. By following a structured approach, it becomes possible to identify whether the battery simply needs a recharge, a cleaning of its terminals, or a full replacement. The following sections outline the key steps involved in this diagnostic procedure, emphasizing safety and methodical observation.
It is important to note that battery issues can sometimes mimic other electrical problems. Therefore, a careful examination of each component, from the terminals to the voltage reading, provides a clearer picture of the battery’s state. This article describes common techniques and considerations for troubleshooting a dead car battery, without offering guarantees of specific outcomes.
Inspecting the Battery Terminals
The first step in troubleshooting a dead battery is to visually inspect the battery terminals and cable connections. Corrosion often appears as a white, green, or bluish powdery substance around the terminal posts. This buildup can interfere with the flow of electrical current, preventing the starter motor from receiving sufficient power. In some cases, the corrosion may be light enough to be cleaned off, while heavy deposits might indicate a need for terminal replacement.
Loose connections are another common cause of a no-start condition. The battery cables should fit snugly onto the terminals without any movement. If the clamps can be wiggled by hand, they are likely too loose. A loose connection can create intermittent contact, leading to unpredictable starting behavior. Tightening the clamp bolts with a suitable wrench can often resolve this issue, provided the terminals are not damaged or excessively worn.
In addition to visual checks, it can be helpful to feel the cables for signs of heat or fraying. Damaged cables may have exposed wire or brittle insulation, which can cause voltage drops or short circuits. If any cable appears compromised, replacing it is generally recommended before proceeding with further tests. Cleaning the terminals with a wire brush and a mixture of baking soda and water can remove minor corrosion, though care should be taken to avoid introducing moisture into the battery cells.
Measuring Battery Voltage
Once the terminals are clean and connections are secure, the next step is to measure the battery’s voltage using a digital multimeter. This tool provides a numerical reading that indicates the state of charge. A fully charged battery in good condition typically shows a voltage between 12.6 and 12.8 volts when the engine is off. A reading below 12.4 volts suggests a partial discharge, while anything under 12.0 volts often means the battery is significantly depleted.
To obtain an accurate measurement, the multimeter should be set to the DC voltage range. The red probe is placed on the positive terminal, and the black probe on the negative terminal. It is important to ensure good contact and to read the display without touching the probes together. If the voltage reading is low, the battery may need to be recharged using a suitable battery charger before it can be tested further.
A voltage reading that drops rapidly under load can indicate a failing battery. Some multimeters include a load test function, or a dedicated load tester can be used. Alternatively, observing the voltage while attempting to start the engine provides a practical load test. If the voltage falls below 10 volts during cranking, the battery may not have enough capacity to start the vehicle reliably. In such cases, replacement might be considered, though other factors such as the alternator and starter draw should also be evaluated.
Jump-Starting the Vehicle
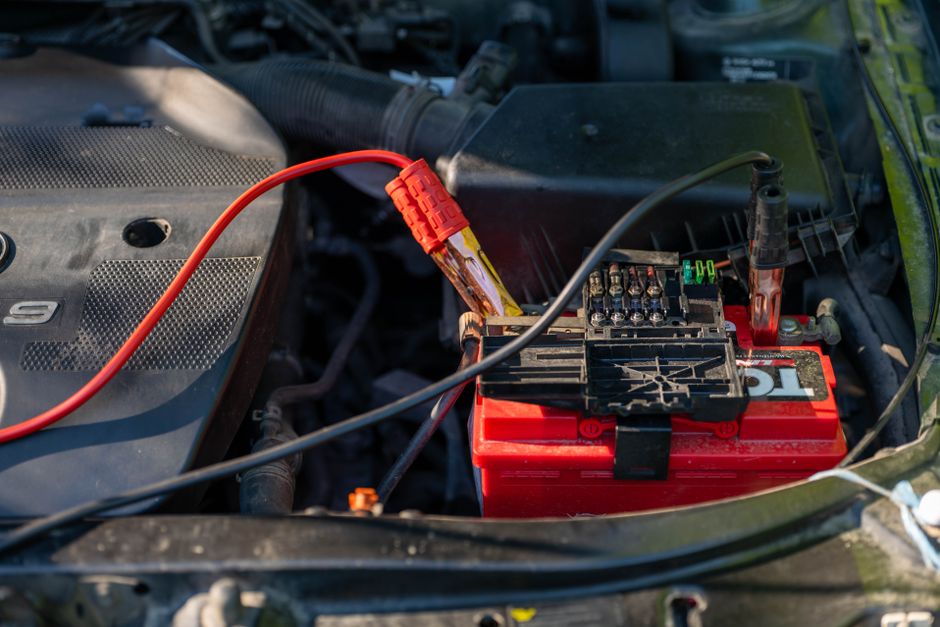
If the battery voltage is low but the terminals are clean and secure, jump-starting the vehicle can be a temporary solution to get the engine running. This procedure involves using another vehicle’s battery or a portable jump starter to provide enough electrical current to crank the engine. It is essential to follow the correct sequence of connections to avoid damage to the electrical systems or injury from sparks.
First, the jumper cables are attached to the dead battery’s positive terminal, then to the positive terminal of the donor battery or jump starter. The negative cable is connected to the donor battery’s negative terminal, and finally to an unpainted metal surface on the engine block or chassis of the dead vehicle. This last connection should be made away from the battery itself to reduce the risk of igniting any hydrogen gas that may be present. Once all connections are secure, the donor vehicle is started and allowed to run for a few minutes before attempting to start the disabled vehicle.
After a successful jump-start, the engine should be left running for at least 15 to 30 minutes to allow the alternator to recharge the battery. However, jump-starting does not address the underlying cause of the discharge. If the battery repeatedly requires a jump-start, further diagnosis is warranted. It is also advisable to drive the vehicle for a longer period rather than idling, as alternators are more efficient at higher engine speeds.
Determining When a Replacement Is Needed
Batteries have a finite lifespan, typically ranging from three to five years depending on usage patterns and environmental conditions. Even with proper maintenance, the internal chemical reactions gradually degrade the plates and reduce the battery’s ability to hold a charge. Recognizing the signs that indicate replacement may be necessary can help prevent unexpected failures.
Common indicators include a slow cranking sound when starting the engine, dim headlights, or the need for frequent jump-starts. A battery that swells or leaks fluid should be replaced immediately, as such conditions can pose safety risks. Additionally, if the voltage reading remains low after a full charge, or if a load test reveals insufficient capacity, replacement is often the practical choice.
It is also worth noting that extreme temperatures, both hot and cold, can accelerate battery wear. In regions with harsh winters, a battery that passed a load test in summer might struggle in colder months. A professional battery test, available at many automotive service centers, provides a more precise assessment of a battery’s health. Such a test measures the cold cranking amps and internal resistance, offering a clearer picture of whether the battery can reliably start the engine under various conditions.